• Skip to primary navigation
  • Skip to content
  • Skip to primary sidebar
  • Skip to footer
  • Facebook
  • Instagram
  • Pinterest
  • RSS
  • Twitter

My Vintage Porch

  • Home
  • About
  • Blog
  • DIY
  • Recipes
  • Travel
  • Shop
    • Shop My Instagram
    • My Etsy Shop
    • IG Links

My Vintage Porch

Interior Design, DIY, and Refurbishing

DIY Painted Rug

Filed Under: Back Yard, Crafts & Projects, DIY, Home Tour, Painting Tagged With: antique, antrhopologie, back porch, better homes and gardens, chair swings, chalk paint, country living, country living magazine, decor, decorations, diy, diy home, farmhouse, farmhouse decor, farmhouse style, front porch, gathered style, Hayneedle, herbs, home, home decor, house and home, house beautiful, milk paint, my country home, neutral decor, outdoor, outdoor decor, outdoors, paint, painted, patio decor, planting, pottery barn, restoration hardware, rustic decor, stencil, stenciling, swing, tutorial, vintage, white decor

Hi Friends! Since I’ve been on the subject of stenciling, I thought that I would share with you how I painted my outdoor rug. I have been wanting to do this for quite some time and I guess yesterday was the day. I usually decide I’m going to do a project 15 minutes before the chaos begins and then my family comes home to a huge mess. What can I say, I’m a “fly by the seat of my pants” kind of girl. I will tell you that painting this rug was so much easier than painting my laundry room floor tile. Painting this rug took me about 1.5 hours minus the border. The process was quite easy but I’m getting a lot of questions so I just thought that I would do a quick explanation about it here and add some affiliate links of where you can find the supplies I used AND where I found my awesome chair swings.


I started with a 5×7 outdoor rug from Target. I love this rug and it was only $60!! I consider that a really good deal for a rug that size. It’s such a great rug that it could be used inside as well. I highly recommend it. I was nervous to paint it at first because I didn’t want to mess up such a nice rug but it was well worth it in the end!


This was the texture and color of the rug before I started…


I decided where I wanted my stencil and taped it down with painters tape on the sides to keep it from moving while I was painting. I also held it down in the areas where I was painting to keep it from moving. It’s a little different painting a rug that a tile floor. I started my stencil at the middle end and left a border around the edge. I found my stencil at Royal Design Studio Stencils and the name of it is Silk Road Suzani Wall Stencil. I am in love with their stencils. This is the same place that I found my stencil for my laundry room floors. Once I had my stencil taped down I began painting with a foam roller. I made sure I was rolling from the edges towards the center of the bare space since the stencil was wanting to move a little on the rug, because of the texture of the rug. It came out perfectly…no bleeding at all!! I had to press firmly with my roller due to the rug needing more paint that a tile floor would. I took this photo after I painted the border just to show you how I taped the stencil. The border was actually the last step in the process.


When I finished stenciling the rug, the one end was not going to have the angled design that I started with on the beginning end so I changed the pattern and flipped the stencil around so I could paint the arch on the other end to accommodate both ends having the same design. I think it still looks great and no one would be able to tell if they weren’t looking for that. I used chalk paint that I made with the color “Winter Way” Behr Paint for the stencil…you can find my recipe here. The border on the outside, I painted with my chalk paint as well in Hematite Behr Paint. I just used Frog Tape where I wanted the border to be, taped off the rug, and then used a foam roller and two coats of paint to paint the border. I initially thought that I would keep the border the same color as the rug but the imperfectness of the edging was bothering me so I taped it off and painted it.


I did not seal the rug with any type of sealer. I figured, being outdoors it’s going to fade a little which I don’t mind. I know that there will be wear and tear, just like any rug that is walked on, but I think using sealer is not a great idea on a rug. It would make it more firm and risk the possibility of the sealer not drying properly, resulting in a sticky feeling. I love the way my rug turned out and what a deal for $60 and using some paint that I already had on hand. I would definitely try this again sometime.


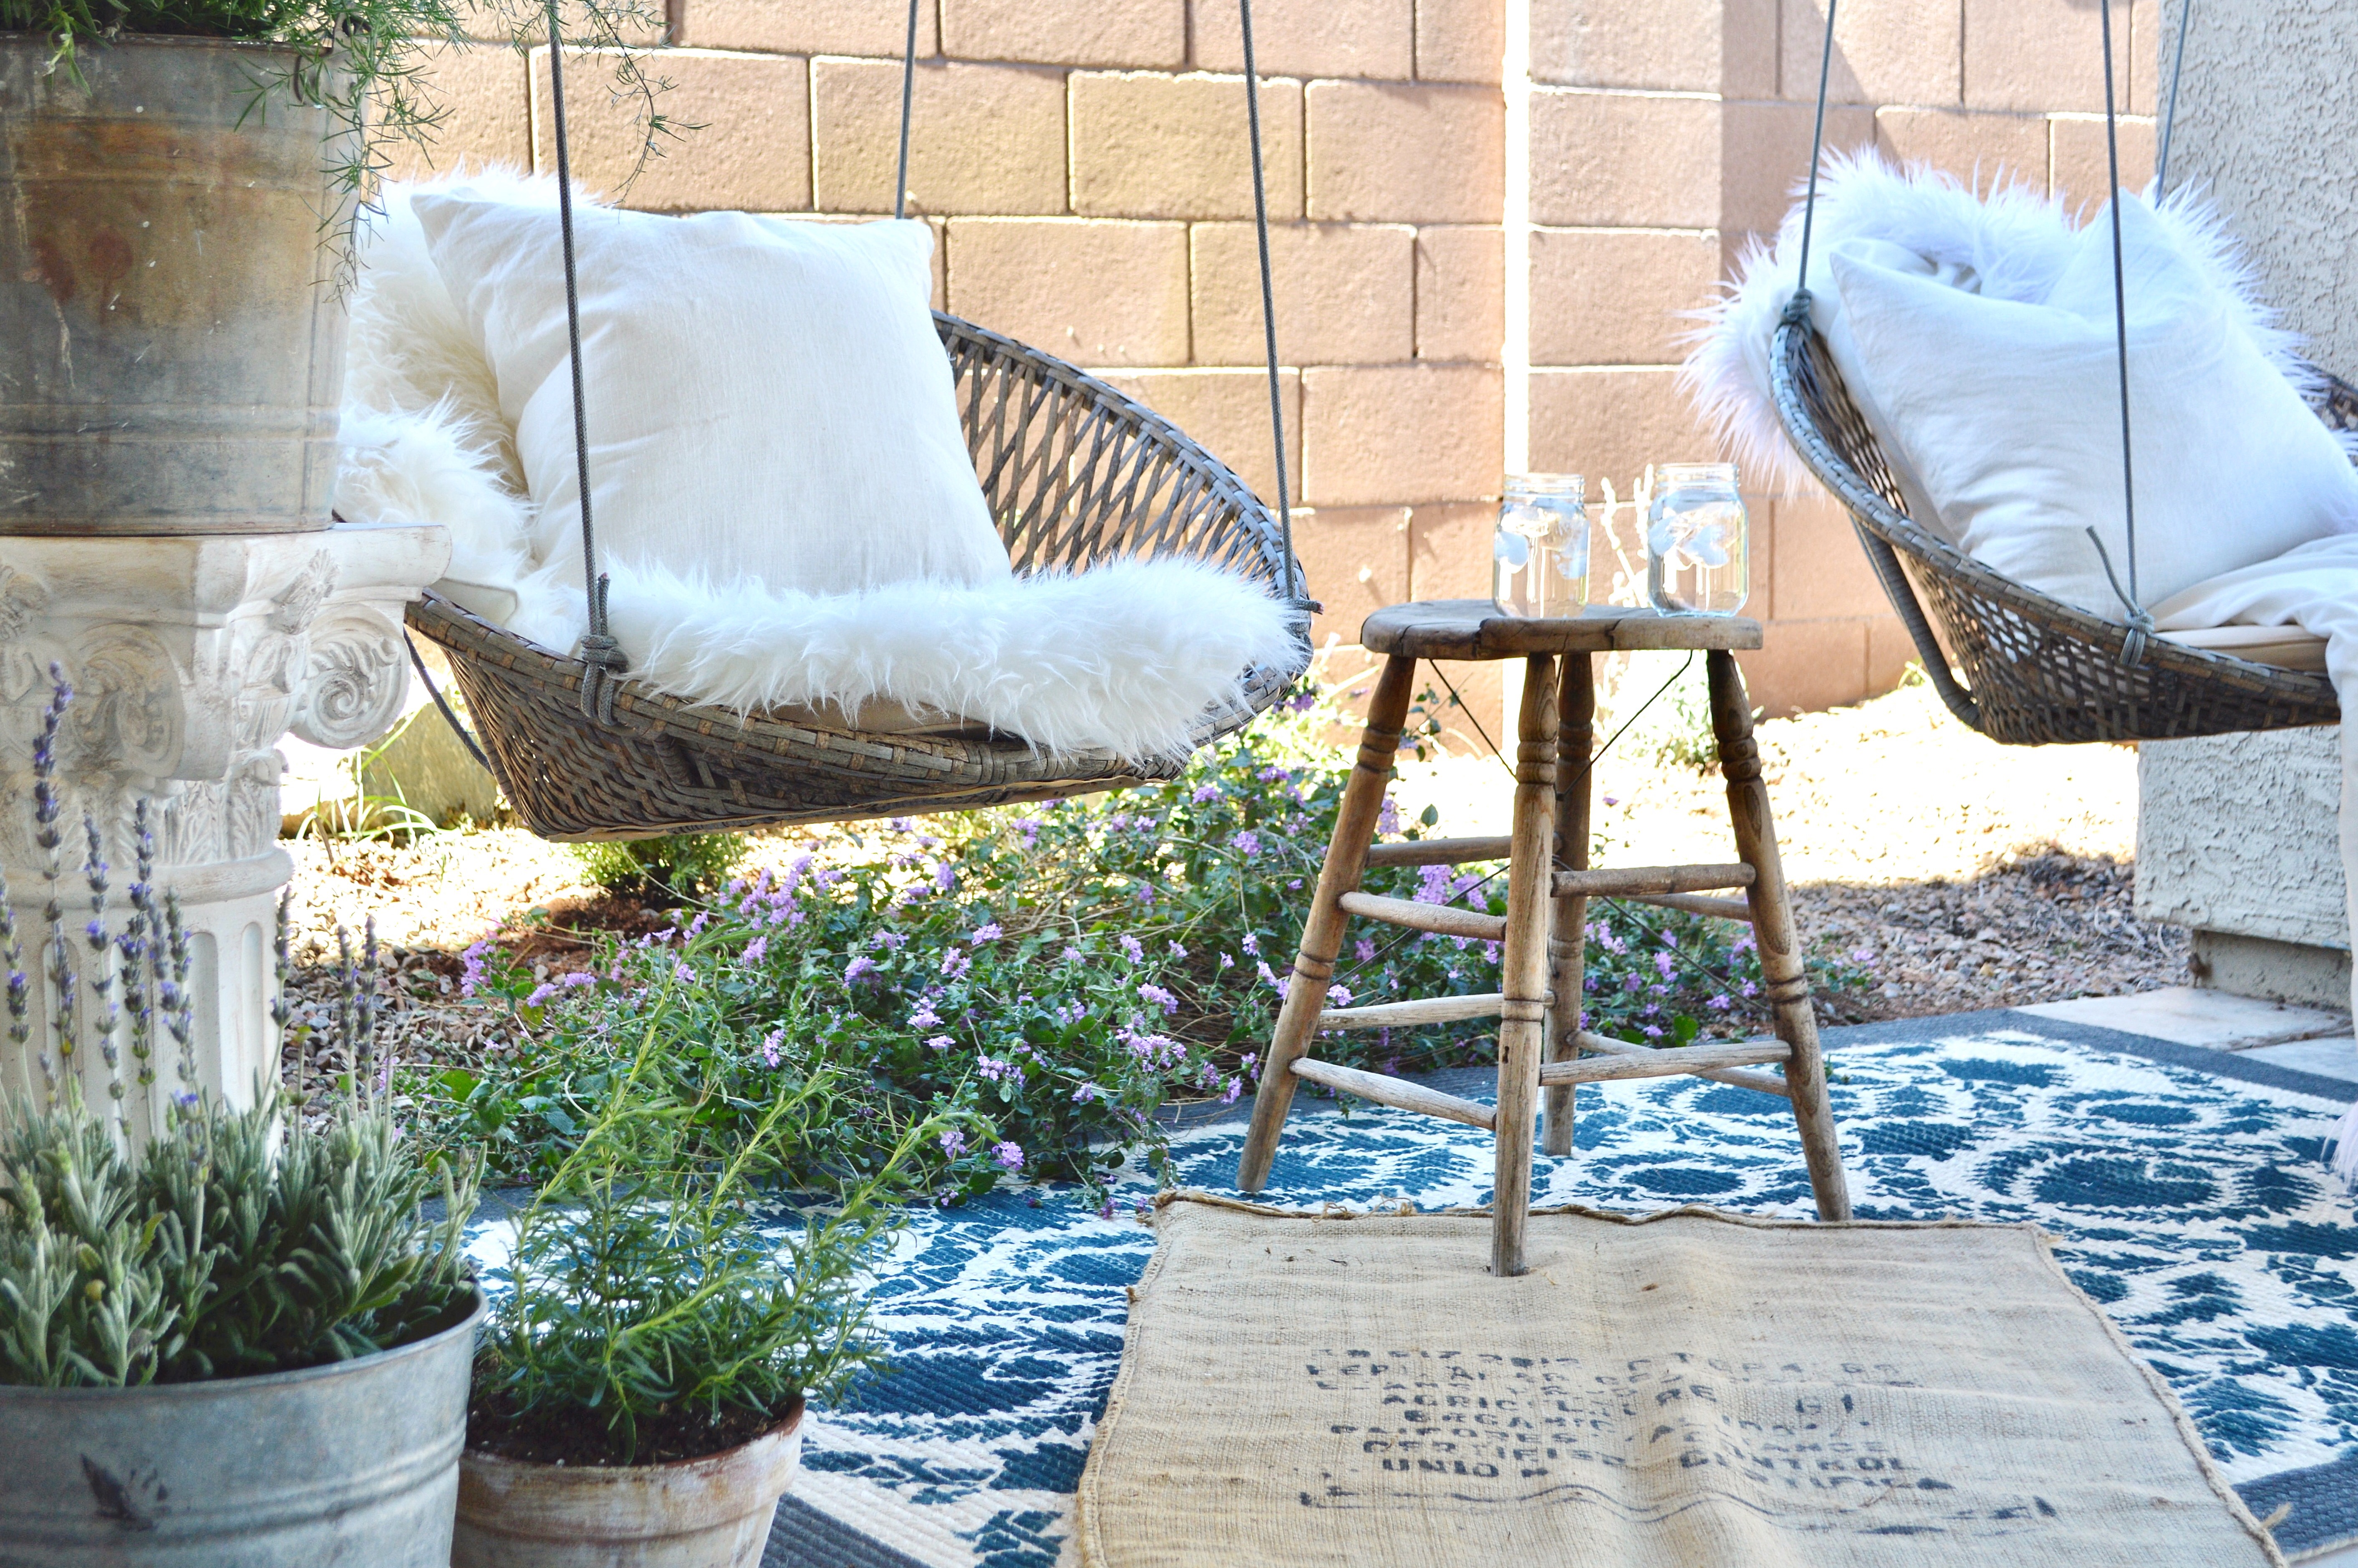
I absolutely love the way this space turned out too! I’ve had A LOT of questions about these chair swings and I don’t think I could love them more than I do!!! My kids love them too and we all fight over who gets to swing first, lol! My hubs said they were so easy to hang. He just hung eye hooks into studs and used the hooks that came with the swings to hang them on to the eye hooks. We did buy our own eye hooks but everything else comes with the swing. They are the best thing ever and so, so, so comfy. I could go on and on about how much I love them but I will just leave you with…go get some now! AND they are on sale right now! I found them here at Hayneedle.


I think I will go swing for a bit before my kids get home from school or I won’t have a chance. Have a great day my friends and thank you so much for stopping by!


Source List: 


Rug prior to stenciling it: Target

Chair Swings: Hayneedle

Pillows: Ikea

Faux Sheep Skin: Ikea

Fluffy Blanket: Home Goods

Burlap Sack: Flea Market

Terra Cotta Pot: From a Friend and Dry Brushed

Old Buckets: Thrifted

Pedestal: Antique Store and Painted and Antiqued with Chalk Paint Recipe here

Old Wood Stool: Antique Store


Paint Colors:


Stenciled Rug: Winter Way Behr Paint made into chalk paint with my recipe here

Border on Rug: Hematite Behr Paint made into chalk paint with recipe above

  • TWITTER
  • FACEBOOK
  • PINTEREST

View More Related Posts

  • Our New Mannington Floors: Phase OneOur New Mannington Floors: Phase One
  • Painting My PianoPainting My Piano
  • My Chalk Painted HutchMy Chalk Painted Hutch

Reader Interactions

Comments

  1. CINDY says

    March 10, 2017 at 8:40 am

    Wow, that $60.00 project looks like $260! I’ve always been a chicken when it comes to painting something so permanent. I’ve been wanting to do a chair of ours but again…bauk bauk (aka chicken talk). 😉 You are brave and it turned out awesome!

    • My Vintage Porch says

      March 13, 2017 at 4:08 am

      ? Thank you so much, Cindy! I’ve painted so many things now that it’s my second nature ??

Primary Sidebar

Search My Vintage Porch

meet natalie

Receive the latest posts from My Vintage Porch!

Sign up to receive an email with my home decor ideas, decorating tips and latest DIYs!

Footer

  • Home
  • Blog
  • About
  • Travel
  • DIY
  • Home Decor
  • Recipes
  • Privacy Policy

Receive the latest posts from My Vintage Porch via email!

Join me on Instagram
@vintageporch
Did you have a fave hutch in stories? (Swipe over) Did you have a fave hutch in stories? (Swipe over) We couldn’t decide either so we just got both...said the wish monster. 🤪We don’t have room yet but I’m hoping for a nice big hutch like one of these to be part of our kitchen in our build. @antiquitieswarehouse has the best stuff!! Our kitchen to come may be a little outside the norm and I’m super pumped about it! Oh, and lots of you wondering the cost of this hutch...let’s just say if you could have a new car or a new hutch, which would you choose? I’ll take the hutch! 😃25K for this puppy #antiquehutch #antiquefurniture
Ahhhh! Can you believe that I got it all straight? Ahhhh! Can you believe that I got it all straight? #sponsor  I love love my new gallery wall!! I found so many fun things @samsclub today (see stories) along with all of the printer ink and supplies that helped me finish off my gallery wall! You can still do great things in a rental my friends, you can!🙌🏼 Sam’s Club sure has amazing deals! And, I can’t wait to try out that carpet cleaner...and blow up that pool for Chester, of course! Yay for fun projects and for just plain fun! 😁🐶 #samspartner #gallerywall #photowall
Mirror, done! What color was your guess? Were you Mirror, done! What color was your guess? Were you scared watching stories? No hot pink or turquoise ...I just wanted it warmer with more gold tones and I love it! It looks older and more realistic now...not so plasticity like before. I’ll show you some close ups in stories soon and will show how I got the old layered look...it’s even better in real life person! #standingmirror #rusticdecor
Do you think I bent the jigsaw blade? 😬 (swipe Do you think I bent the jigsaw blade? 😬 (swipe over) It was worth it all none the less. This was a “bench in a day” project. The thing that took the longest was refinishing it, the rest was cake...after we fixed the boards that Bob the Builder messed up. It will eventually go in the hallway. I hadn’t added the screws here yet bc I was running out of daylight to get a photo but check stories and I’ll show you how I’m (I mean Trav) is putting it together. He insisted on helping me when my arm fell off from all of the refinishing. What a sweet guy! ♥️ #rusticbench #diybench
Did you see this huge undertaking in stories and t Did you see this huge undertaking in stories and the plucking of the eyebrows with a needle nose plyers? Talent🙋🏼‍♀️ Stupidity 🙋🏼‍♀️I may not have any fingerprints left but the hutch is done and I’m in love!!! (Swipe over) 45,872 hours later and I have a hutch like no other. Can you believe I added layers of texture to this thing, painted it, didn’t like it, decided to sand it to the nubbins, white washed it, and then glazed it?!?! 🤩 Yeah, most of you probably know me too well by now...I’m nutso and I know it. Now to decide if I should put the original hardware back on or change it up. I’m thinking I’m loving the look of the old hardware on it. What do you think? (Swipe to the end to see the “before” and hardware I’m thinking of using) #oldhutch #antiquehutch #pinehutch #rusticfurniture
I’ve gone pot nuts! (Swipe over for close up and I’ve gone pot nuts! (Swipe over for close up and “before”...see below for colors used) This pretend pot slingin is some fun stuff!! And, this slingin it in this new craft space of mine is even more fun! I just finished this pot and I love it!! Just call me high on pot life...I’ve taken my old POTS health and changed it out for a new pots way! 🙌🏼 If you can’t find me, I’ll be over here just working with my pot! And, I’ll let you in, if you bring grain free brownies...or cupcakes...but I prefer the brownies🤔. And, I would share my grain free pretzels with you...After crying about Hallie forgetting my pretzels that one time, I now have about 10 bags fully stocked at all times. 😂 #morepots #thegoodkind #antiquepots 
.
.
.
I used paint samples in matte finish and explained more of the process on my blog (link in profile) 
COLORS: 
1. Pot with handles: Behr paint “Studio Taupe”, “Deconstruction”, and “Cool Charcoal”
.
.
2. Glass pots turned old: a mixture of Apple barrel craft paint “brown oxide”, “burnt umber, a dab of red, and a bit of black to make a terra cotta color, “Studio Taupe” Behr paint, and “Deconstruction”  Behr paint 
See blog post (in profile) for how I made my salt mixture for a more texturized paint
. 
.
3. Rounded pot: see blog post in profile for colors and technique used
This error message is only visible to WordPress admins

Error: The account for needs to be reconnected.
Due to recent Instagram platform changes this Instagram account needs to be reconnected in order to continue updating. Reconnect on plugin Settings page

Copyright © 2021 | Exclusive member of Mediavine Home